You may be wondering why we’re talking about tomatoes in the middle of November. I wrote this post a few weeks ago, but with the business of closing the “official” market season, I haven’t had any time to put it up! It was a great experience, so I wanted to share–consider it inspiration for next year. This technique can be used for other high-acid vegetables, or vegetables to which an acidic ingredient, such as lemon juice, has been added.
Two weeks ago I had the opportunity to stay with one of the vendors at the Taos Farmers’ Market, Jeff Cochran, on his half-acre organic farm Talpas Gardens. I just so happened to visit when his tomato harvest was overflowing, so I got some schooling in basic canning.
Turns out it’s simpler than I thought. Tomatoes are acidic enough that, according to tradition (if not most canning books), you can actually can them with no additional ingredients. Jeff has been doing this for years, so I trust his judgment.
The only special equipment you really need in canning acidic vegetables (jury’s out on veggies with a pH higher than 4.6) is a canning jar lifter, which is cheap and will make your job much easier. The rest is pretty standard kitchen equipment: a chopping knife, cutting board, two pots, a ladle and a towel or two.

First, we cut off the stems of the tomatoes and gave them a rough chop. (That’s Mary, the Taos Farmers’ Market business manager). You can remove the seeds, but we didn’t bother.
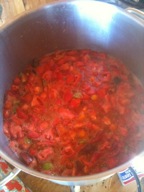
Then, we put all of the chopped tomatoes in a pot and cooked them for 20 minutes. While the tomatoes were cooking, Jeff sterilized the jars and lids by submersing them in a boiling water bath for 10 minutes (keep the water bath going when you’re done with sterilization; we used the same one to later seal the jars).
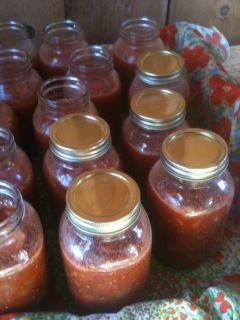
After that we used a ladle to pour the tomato sauce into quart-sized mason jars. Leave approximately ½-1” of space at the top of the jar, because the vacuum seal will cause the liquid to expand; if you don’t leave any room, your tomato sauce will leak through the lid of the jar.
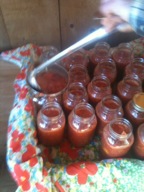
We wiped the lips of the jars to clean off any sauce spills and placed new lids* on top, then screwed on the metal bands until they were just hand tight**. You don’t want a too-tight screw band, because if you don’t leave enough room for the lid to lift up as air escapes, the lid won’t vacuum seal. You want the lid to have room to lift up ever so slightly to create the seal.
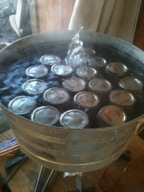
Finally, we put the jars in the water bath at a rolling boil. The water should completely cover the tops of the jars. You can set a circular cake cooling rack on the bottom of the pot to more evenly heat the jars, but it isn’t really necessary if you’ve already cooked the food. Leave the jars in for 10-15 minutes. Precision, I’m told, is not as necessary as some canning books claim. This part is just to heat the air enough that it expands, escapes through the lid and creates a vacuum seal.
Take out the cans with your canning jar lifter, let them cool, and voila! Fresh, preservative-free heirloom tomato sauce ready any time you want when you’re craving a taste of summer.
*NOTE: there are TWO parts to the tops used on canning jars: the lid (a circular piece of metal with a rubber seal around the circumference) and the screw band (screws onto the lip of the jar to hold the lid in place). You can reuse your screw bands, but every piece of literature I’ve ever read on canning recommends replacing the lids after each use. This is because removing the vacuum-sealed lids to retrieve your canned foods tends to warp the lid, so it won’t seal effectively the second time. (I’ll tell you a secret, which is that we’ve actually used old lids for pickling and have had great success). Another secret: reusable lids exist!
** “Hand tight” might sound a bit subjective/obtuse/vague, so here’s a good way to get the right fit: turn the band with one hand, and DON’T use your second hand to hold the jar. As soon as the jar begins to turn with the band, you’re done!